BigCommerce is one of the leading CMS for eCommerce websites which help business owners to create & set up their online store and give them endless options for tracking their sales, the opportunity for increase revenue & more.
BigCommerce is now a widely used CMS along with leading eCommerce-enabled CMS like Woocommerce, Magento, Shopify etc.
How much does BigCommerce Cost?
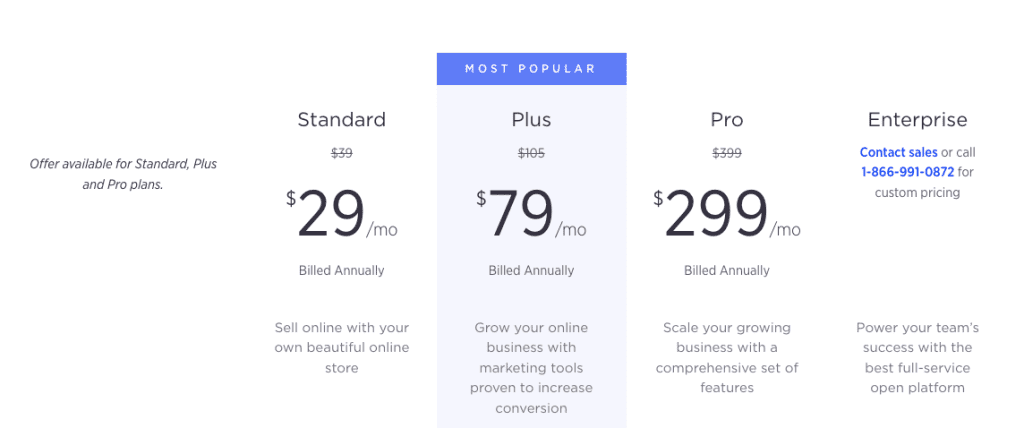
BigCommerce comes with various pricing & plans along with a 15 days free trial so that the user can try & identify if it is useful for them.
Its pricing starts from $29/mo & goes till $299/mo according to the business need.
They also offer a customized plan for large-scale enterprises.


Once you setup your store in BigCommerce, you need to adopt some marketing techniques like SEO, Paid ads to get your first online sale.
Once you start any marketing campaign, it is very important for you to set up all the tracking so that you can justify which marketing module works for your store.
In this blog, we will be learning how to set up Google Ads conversion tracking in BigCommerce with values.
So, whenever you set up any Google Ads campaign for your website for any CMS, you obviously install Google Ads conversion tracking to the website in website backend or use Google tag manager to do that so that you can know what the cost of each sale you are bearing, what is the conversion ratio & the most important thing; the value of each conversion.
The setup of Google Ads conversion tracking is easy but the issue is, not everyone can easily set up the conversion value tracking in BigCommerce.
In this blog, we will take you to through the process of how you can easily set up Google Ads conversion tracking in BigCommerce with conversion values without using Google Tag Manager.
Here are the steps you need to follow:
Step 1: Go to Google Ads & pull the Conversion Tracking Code
As a very first step, you need to sign in to your Google Ads account which you are using or about to use for running your Google Ads.
Once you are logged in, go to Tools & Settings> Conversions (Under Measurement)


After this, you will be on the conversion page where you will see the list of conversions you have created. If you don’t see any list, don’t worry, you are about to create one.
Click the blue icon to “Add a new conversion”


Once you click on the blue button for adding the new conversion, you will be landed on a window for setting up the attributes for the conversation you want to track.
Choose the type of conversion you want to track. Since we are setting up a BigCommerce store, hence choose Website.


The next window will ask you about some details which you need to start filling, you can simply add this as per your need.
In my case I have added as mentioned below:
Category: Purchase
Conversion name: Purchase or Sales from Website
Value: Choose “Use different values for each conversion” & add a default value of $1.5.
Note: You can choose the currency as per your need or the BigCommerce store currency. I’ve chosen USD.
Count: Choose “Every”
Click-through conversion window: 30 days
View-through conversion window: 1 day
Include in “Conversions”: Yes
Attribution model: Last Click


Once you do this click Create & Continue.
Step 2: Copy the Conversion ID & Label to place in a custom code
In the next screen, it will ask how you want to install your tag.
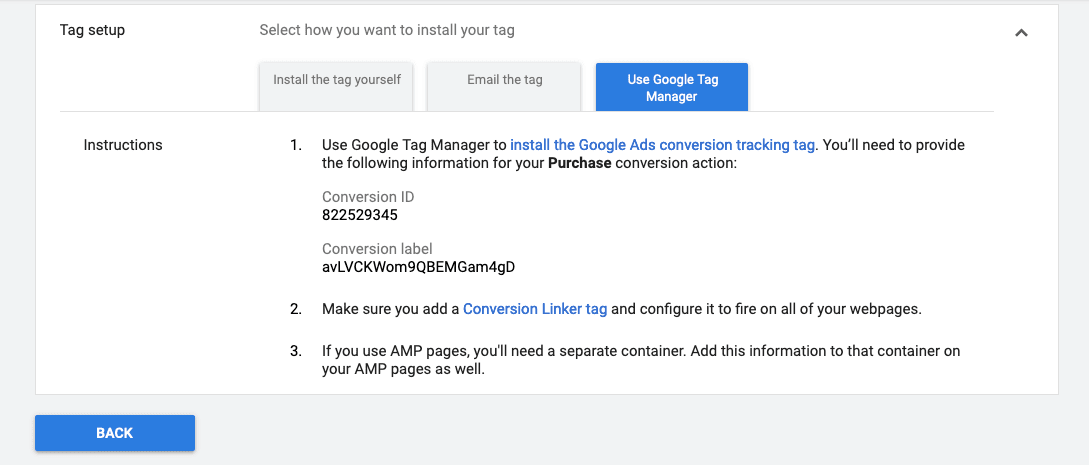
Since we are going to install this direct to the website, so choose “Use Google Tag Manager” as we just need to copy the Conversion ID & Conversion Label.


Once you copy the Conversion ID & Conversion Label, you need to replace the codes in below-mentioned code as per the image.


Here is the code for you (don’t forget to replace the Conversion ID & Conversion Label where required.
<!-- Global site tag (gtag.js) - Google Ads: XXXXXXXXX -->. // Replace your Conversion ID with XXXXXXXXX
<script async src="https://www.googletagmanager.com/gtag/js?id=AW-683916070"></script>
<script>
  window.dataLayer = window.dataLayer || [];
  function gtag(){dataLayer.push(arguments);}
  gtag('js', new Date());

  gtag('config', 'AW-XXXXXXXXX');  // Replace your Conversion ID with XXXXXXXXX
</script>
<script>
  gtag('event', 'conversion', {
      'send_to': 'AW-XXXXXXXXX/XXXXXXXXXXXXXXXXXXXXX',  // Replace your Conversion ID/Conversion label with XXXXXXXXX
      'value':  %%ORDER_AMOUNT%%,
      'currency': 'USD',
      'transaction_id': '%%ORDER_ID%%'
  });
</script>
Step 3: Place the code in the BigCommerce store
Once you are done with replacing the values as mentioned above, its time to add the code to the BigCommerce CMS. To do this, follow the steps mentioned below:
- Log in to your BigCommerce Store
- Go to Advanced Settings > Affiliate Conversion Tracking
- Copy the above code & place in the Conversion Tracking Code box
- Click Save once done.


Congratulations, you just set up the Google Ads conversion tracking with order ID & Order value functionality.
From now on, you will be able to see how many conversions you have received from your Google Ads & the average values of all the conversions.
If you think we have missed any important step or you know any other way to do this setup, let us know in the comments.
We provide SEO & Google Analytics Consulting services in the following countries:
United States | United Kingdom | Australia | Singapore | India | New Zealand | Dubai
Related Articles
How to Setup Enhanced Ecommerce Tracking to WooCommerce
How To Setup Facebook Pixel & Events (With Google Tag Manager)
How to Setup Ninja Forms Event Tracking with Google Tag Manager
The Use of Artificial Intelligence (AI) in SEO – All You Need To Know
How to Setup Contact Form 7 Event Tracking with Google Tag Manager


I loved the info!
Thanks Matt.