Running Facebook ads for your business is the best decision you make, mainly if you are into B2C business module offering any product & service.
With Facebook ads, you can target the audience as per your product/service area & it gets less costly as compared to Google Ads, yeah there may be a chance that the lead quality will be different in compression of Google ads but Facebook ads have its own audience base where you can get good customers as well.
When you are running any Facebook ads campaign, it is also very important to measure the outcome, traffic, leads/purchase, or any type of action on your website which happens because of Facebook ads.
Facebook ads manager has a different tracking system which tracks user activities with the JavaScript on the website called Facebook Pixel code.
What is Facebook Pixel?
Well just like Google Analytics tracking code, Facebook offers a code from its platform which needs to be placed at the website/app before you get into the Facebook ads campaign.
This activity is called Facebook event tracking where you not only gather the conversions on the website but the user actions & custom conversions as well if you have any.
There are many ways to add the Facebook pixel which depends on the CMS type for each website.
In the simple configuration, you need to place the code to the website using any plugin, which I genuinely don’t recommend as this may increase the website load issues.
That is why people have started using the Google Tag Manager so that they can use all the website tracking without bothering the website performance & speed.
In this blog, I will show you how to configure Facebook Pixel on any website using Google Tag Manager.
Before we start, you need to understand each pixel type so that it would be easy for you to determine what type of pixel activity you want to track.
Facebook Pixel Types
So, the Facebook pixel has two types of tracking which means that there is a universal Facebook pixel code which you need to place to all pages of your website (This is a general code which is important for all websites) & then you need to place the second code as per your need.
Here are different type of pixel code which you need to be across:
Purchase: This code is placed when someone makes a purchase on your website.
Lead: For signs up/ form submissions or any activities which require form filling & advertiser gets information.
Complete registration: Registration form submissions on your websites, such as a subscription form.
Add payment info: When someone enters their payment details in the purchase process on your website.
Add to cart: As the name says for adding any product to the shopping cart on your site.
Add to Wishlist: Adding a product to a Wishlist on your site.
Initiate checkout: Someone starts the checkout process to buy any product from your site.
Search: Someone uses the search function to look for something on your site.
View content: When you want the user to lands on any specific page on your website.
Contact: Someone contacts your business like clicks on phone, emails etc.
Customize product: Someone selects a specific version of the product, such as choosing a certain colour.
Donate: This is for a charity website when someone makes a donation to your website.
Find Location: Someone searches for your business’s physical location.
Schedule: Someone books an appointment at your business, consultation services kind of businesses.
Start trial: When you offer a free trial & want to track signs up for a free trial of your product/service.
Submit application: Someone applies for your product, service, or program, such as a credit card.
Subscribe: Someone subscribes to a paid product or service.
Here is how you can start its implementation with Google Tag Manager.
Step 1: Go to Facebook Ads Manager > Events Manager & Click on Connect data source
Step 2: A pop-up screen will appear which will ask you to Connect a new data source. Here you need to choose if you want to run ads for your website or app. Choose the best option as per your need.
I’ve selected the website as we are doing this for a website here. Once you select choose Get Started.
Step 3: In the next screen, it will ask you to select a connection method, choose Facebook Pixel.
Step 4: You need to add the website name & URL to generate the general Facebook pixel tracking code.
Step 5: Now, in the next screen it will ask you to choose how you want to install pixel code, here you can select the Manually add pixel code to the website if you want to do this with Google tag manager or you may choose to Use a partner integration for adding this if you want to do this with your CMS (WordPress, Magento, Shopify, BigCommerce etc).
Since we are doing it with Google Tag Manager, we will opt for Manually add pixel code to the website.
Step 6: Now you will be landed on the Facebook pixel base code script which usually goes to all pages of the website.
Just copy this code & paste it in a notepad, This code is similar for all websites, you just need to change the unique pixel code on each website.
It looks like this:
<!-- Facebook Pixel Code -->
<script>
!function(f,b,e,v,n,t,s)
{if(f.fbq)return;n=f.fbq=function(){n.callMethod?
n.callMethod.apply(n,arguments):n.queue.push(arguments)};
if(!f._fbq)f._fbq=n;n.push=n;n.loaded=!0;n.version='2.0';
n.queue=[];t=b.createElement(e);t.async=!0;
t.src=v;s=b.getElementsByTagName(e)[0];
s.parentNode.insertBefore(t,s)}(window, document,'script',
'https://connect.facebook.net/en_US/fbevents.js');
fbq('init', 'XXXXXXXXXXXXXXX'); 		//Replace 'XXXXXXXXXXXXXXX' with your Pixel code
fbq('track', 'PageView');
</script>
<noscript><img height="1" width="1" style="display:none"
src="https://www.facebook.com/tr?id=XXXXXXXXXXXXXXX&ev=PageView&noscript=1"
/></noscript>. 		//Replace 'XXXXXXXXXXXXXXX' with your Pixel code
<!-- End Facebook Pixel Code -->
Save above code, for now, we will be implementing all the codes all together in Google Tag Manager
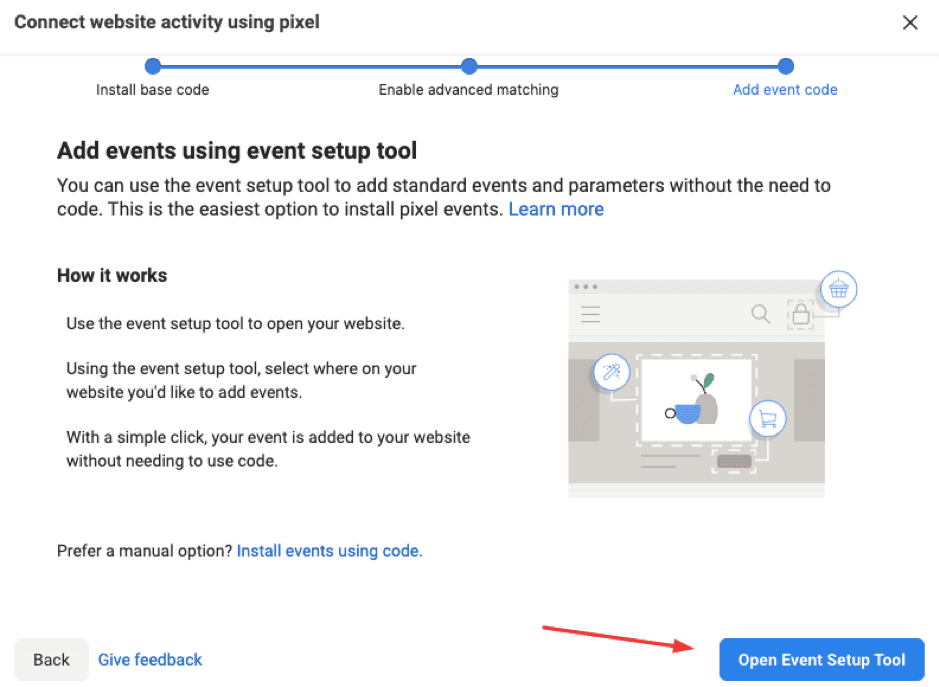
Step 7: Now we need to look out for event code as per the Facebook ads you are running. For this, you need to be on the same prompt of Facebook pixel base code & hit continue until you reach on Connect website activity using pixel window.
Once you get there, click on Install events using code as mentioned on the image below you will be landed on the event code implementation page.
Do not get confused on the new window, it will be used once we set up the Facebook pixel code using Google Tag Manager.
Step 8: Now you need to go to Google Tag Manager & create a new tag to set up Facebook pixel tag. TO do this, Go to Google Tag Manager > New Tag & Choose Custom HTML.
Once you copy the code mentioned above in this blog (by replacing the unique pixel ID to the required places as mentioned in screenshots) Choose trigger & fire to All Page.
Once you do this, publish all the changes & you are set to go.
Step 9: Once you set this up you need to define the events to all your conversion actions. As mentioned in above Step 7. There are two methods one is manual & other is using Event Setup Tool.
In manual setup, you need to add the code as mentioned above in the blog according to your conversion action types (such as Add To Cart, Purchase) to the various actions & pages.
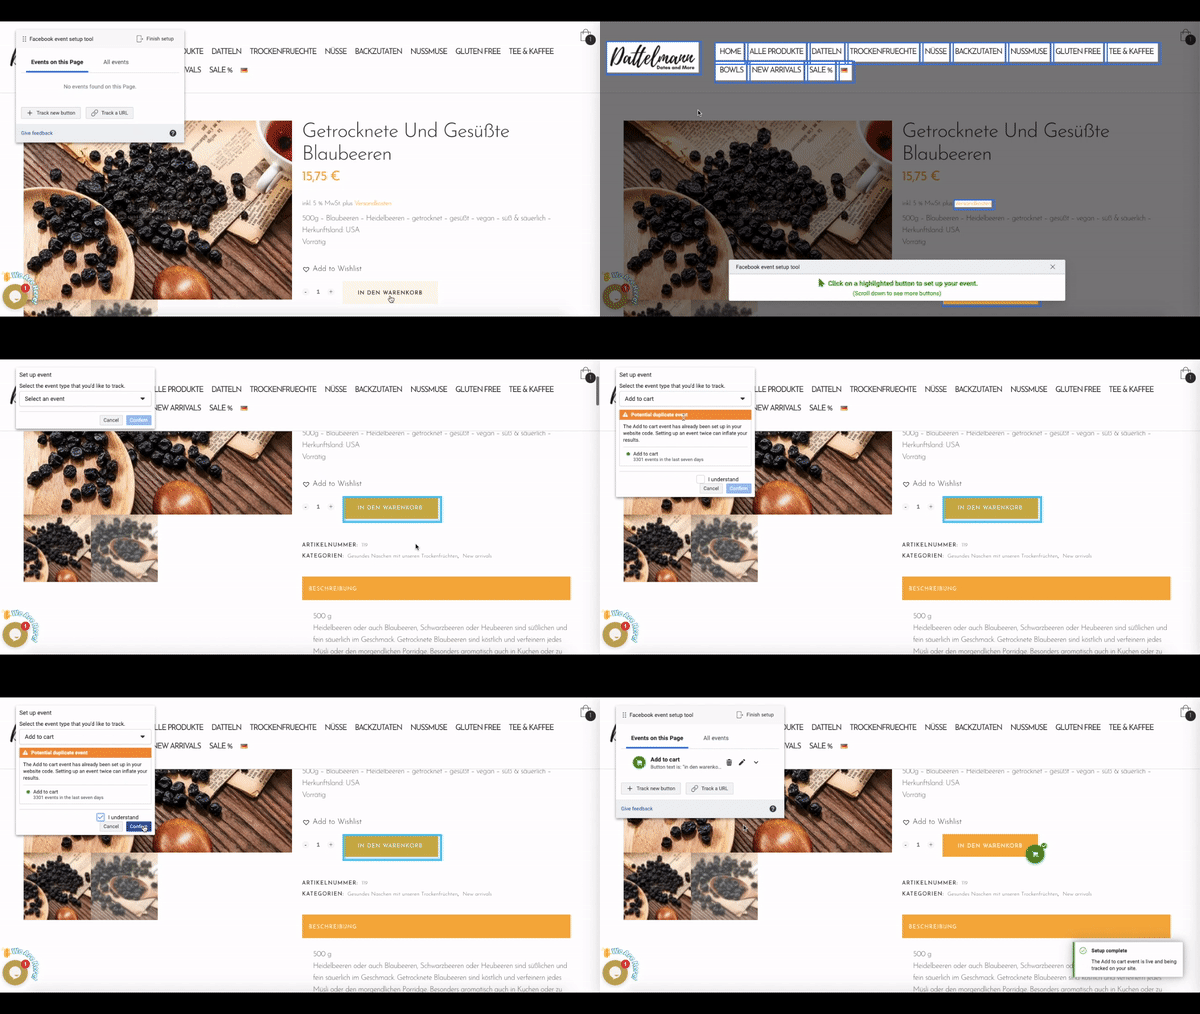
In the Event Setup Tool, You need to use this smartly.
So when you hit the Open Event Setup Tool, it will ask you to put the website for which you want to set up the events.


Once you click on the button & add website on the pop-up, it will land you on your website along with a pop-up which helps Facebook to understand the events.
In this popup, you need to choose the event type as per the direction mentioned below the image.


Using the above method, define all event to Facebook & polish them and you are set to go.
We have covered all the points which are required to install Facebook pixel & event tracking.
If you think we have missed any important point or you need any help in setting up Facebook Pixel or running Facebook Ads, let us know in the comments section or for any help, email us at customers@searchenginemonkey.com.
We provide SEO & Google Analytics Consulting services in the following countries:
United States | United Kingdom | Australia | Singapore | India | New Zealand | Dubai
Facebook Pixel Setup FAQs
Most frequent questions and answers
Facebook Pixel code runs on javascript, just like Google Analytics we need to install it on website & you will be able to track the user activities.
When you start Facebook Ads, you can see the data of your Facebook users & their activity in Facebook Analytics.
Facebook pixel helps advertisers to check their users activities on website which they use it in further website optimization to get more from their website.
Facebook & Instagram ads work on same platform. As these are both belongs to Facebook, Pixel activities works for both of them.
Related Articles
10 Most Popular Content Marketing Platforms 2020 (With DA)
Social Media Statistics You Need To Know in 2020
How To Do Instagram Marketing – A Start To Finish Guide
How to Setup Google Ads Conversion Tracking in BigCommerce (With Order Amount & Order ID)
How to Setup Enhanced Ecommerce Tracking to WooCommerce
How to Setup Ninja Forms Event Tracking with Google Tag Manager


It is really a great and useful piece of information. I am glad that you shared this helpful info with us. Please keep us up to date like this. Thanks for sharing.
Thanks Burwell.
Nice Post!
Thanks Thomas.
There is certainly a great deal to find out about this topic.
I really like all of the points you’ve made.
Thanks Polly!